Sunday, May 30, 2010
Salmon Teriyaki

Swedish Visiting Cake

(from The Little Teochew)
Makes 8 to 10 servings
- 1 cup sugar, plus extra for sprinkling (I used 0.8 cup)
- Grated zest of 1 lemon
- 2 large eggs
- 1/4 teaspoon salt
- 1 teaspoon pure vanilla extract (I used vanilla beans)
- 1/2 teaspoon pure almond extract
- 1 cup all-purpose flour
- 1 stick (8 tablespoons) unsalted butter, melted and cooled
- About 1/4 cup sliced almonds (blanched or not) ( I used almond nibs)
- Center a rack in the oven and preheat the oven to 350 degrees F (about 175 degrees celsius). Butter a seasoned 9-inch cast-iron skillet or other heavy ovenproof skillet, a 9-inch cake pan or even a pie pan.

- Pour the sugar into a medium bowl. Add the zest and blend the zest and sugar together with your fingertips until the sugar is moist and aromatic. Whisk in the eggs one at a time until well blended. Whisk in the salt and the extracts. Switch to a rubber spatula and stir in the flour. Finally, fold in the melted butter.
- Scrape the batter into the pan and smooth the top with a rubber spatula. Scatter the sliced almonds over the top and sprinkle with a little sugar. If you're using a cake or pie pan, place the pan on a baking sheet.
- Bake the cake for 25 to 30 minutes, or until it is golden and a little crisp on the outside; the inside will remain moist. Remove the pan from the oven and let the cake cool for 5 minutes, then run a thin knife around the sides and bottom of the cake to loosen it. You can serve the cake warm or cooled, directly from the skillet or turned out onto a serving plate.
Monday, May 10, 2010
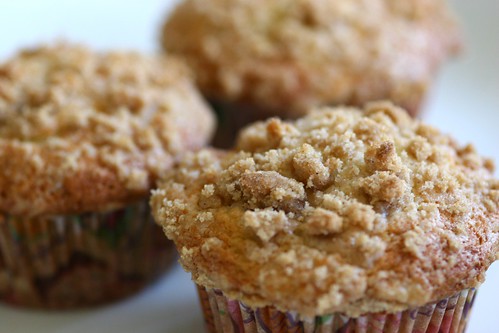
Banana Crumb Muffin
I googled for a good banana muffin/cupcake recipe and found this in Allrecipe.com.

The minute I read through the recipe and saw the number of positive reviews on it I was SOLD. I have got to turn those pathetic bananas into the scrumptious and aromatic muffins.
These muffins smell so heavenly when freshly out from the oven. The crumbs give a crunchy twist to this soft and light muffin.
I did reduce the sugar in my muffin as we prefer them to be less sweet.
Banana Crumb Muffin (adapted from Allrecipe.com)
Ingredients
- 1 1/2 cups all-purpose flour
- 1 teaspoon baking soda
- 1 teaspoon baking powder
- 1/2 teaspoon salt
- 3 bananas, mashed (I used 4 )
- 3/4 cup white sugar (I reduced to ½ cup)
- 1 egg, lightly beaten
- 1/3 cup butter, melted
- 1/3 cup packed brown sugar
- 2 tablespoons all-purpose flour
- 1/8 teaspoon ground cinnamon
- 1 tablespoon butter
Method
- Preheat oven to 375 degrees F (190 degrees C). Lightly grease 10 muffin cups, or line with muffin papers.
- In a large bowl, mix together 1 1/2 cups flour, baking soda, baking powder and salt. In another bowl, beat together bananas, sugar, egg and melted butter. Stir the banana mixture into the flour mixture just until moistened. Spoon batter into prepared muffin cups.
- In a small bowl, mix together brown sugar, 2 tablespoons flour and cinnamon. Cut in 1 tablespoon butter until mixture resembles coarse cornmeal. Sprinkle topping over muffins.
- Bake in preheated oven for 18 to 20 minutes, until a toothpick inserted into center of a muffin comes out clean.
Tuesday, May 4, 2010
Walnut Pandan Chiffon Cake

Walnut Pandan Chiffon Cake
Ingredient
4 Egg Yolk
Coconut Milk 70g + a pinch of salt
Superfine Flour 100g
3 blades of Pandan leaves (blend with 2 tbsp water till fine)
5 Egg White
Castor Sugar 40g (add more if u like it sweet)
0.5 tsp lemon juice (optional)
Roasted walnuts
Method:-
- Combine Ingredient 1 - 4 until well blended, leave aside.
- Beat egg whites with electric beater till frothy, add in the sugar and lemon juice. Then continue to beat till stiff peaks are formed.
- Mix 1/3 of egg white into egg yolk batter, and then FOLD in remaining egg white foam into batter with a whisk.
- Line the chiffon tin with walnuts
- Pour batter into chiffon tin and bang the tin to release the bubbles.
- Bake in preheated oven 175°C for 30 - 35 minutes* or till cooked.
- Remove from oven and invert cake tin immediately for 30 minutes.
Note : By blending the pandan leaves, it will yield a dark green colored and more fragrant cake compared to just using the juice.
The walnut adds an additional texture and the nutty taste is a great match to the pandan chiffon cake.
Verdict : This is a keeper.
Sunday, May 2, 2010
Workstation


.JPG)


