Friday, December 25, 2009

Christmas Cookies


Merry Christmas!!!!!!!

Last night my family and I attended 2 Christmas eve parties. I thought it should be a good idea to bring some homemade cookies to the host. So a couple of days ago, I began thinking of what to bake. I loved those gingerbread man cookies that I baked earlier this month. However, since I do not have the gingerbread man cookie cutter, it will be very tedious to hand cut them again. So... I decided to use the same recipe but cut them into Christmas trees instead. The end result was pretty good. I used lime juice and green food coloring for frosting.


To complement the rich spice flavor of the gingerbread cookies, I searched for something light and refreshing. I remembered watching an episode of Martha Stewart where she baked some lime cookies that melts in the mouth. Then coincidentally, Ju of The Little Teochew wrote a post on it on the 23rd Dec. I was so delighted to see the post.... Thanks Ju... I need not search for the recipe now. After reading her post I immediately made up my mind to bake them. She takes very good pictures and gave a good review and tips on this recipe.

Lime Meltaways

I spent the whole afternoon baking these 2 cookies. Packed them up into 2 boxes tied with a pretty lavender colored ribbon for the hosts.

I am glad that the cookies were very well received and well complimented (too!!).
There were numerous requests for the recipes.
Here is the recipe as promised.
For the gingerbread Christmas Tree cookies...please refer to my previous post on Gingerbread Man

Lime Meltaways (original recipe from Martha Stewart)

Ingredients
  • 12 tbsp butter (1 1/2 stick or 6oz) unsalted butter at room temperature
  • 1 cup confectioner's sugar (icing sugar)
  • Grated zest of 2 lime
  • 2 tbsp of freshly squeezed lime juice
  • 1 tbsp pure vanilla extract
  • 1 3/4 cups plus 2 tbsp all-purpose flour
  • 2 tbsp cornstarch
  • 1/4 tsp salt
Method
  1. In the bowl of an electric mixer fitted with the whisk attachment, cream butter and 1/3 cup sugar until fluffy. Add lime zest, juice and vanilla; beat until fluffy.
  2. In a medium sized bowl, whisk together flour, cornstarch and salt. Add to butter mixture, and beat on low speed until combined.
  3. Between two 8-by12-inch pieces of parchment paper, roll dough into two 1 1/4 inch (~3cm) diameter logs. Chill at least 1 hour.
  4. Preheat oven to 350 degrees F (~190 degree C). Line 2 baking sheets with parchment paper. Place the remaining 2/3 cup sugar in a resealable plastic bag. Remove the logs fro the parchment paper and slice the dough into 1/8" (~3mm) thick rounds.
  5. Place the rounds on the baking sheets, spaced 1" apart.
  6. Bake cookies until barely golden, about 15 minutes. Transfer the cookies to a wire rack to cool slightly (8 -10 minutes). While still warm, place cookies in the sugar-filled bag; toss to coat.
  7. Store baked cookies in an airtight container ( can last up to 2 weeks).
Notes

I baked these cookies into cute little rounds of 2.5 - 3cm in diameter.
The thickness is about 3mm.
Like The Little Teochew, I found that baking at 190C for 15minutes will result in burnt cookies. So, I baked mine at 160C for 9 minutes.

Happy Baking ;p


Monday, December 21, 2009

Cognac-Flavoured Crostini

My eldest son had a pot-luck party with his High school friend last night. He was requested to bring some garlic bread for the occasion. Naturally, he had to turn to his mother for assistance.

After giving it some thoughts, I suggested to him that instead of the normal garlic bread, why don't he bring crostini instead. I came across an interesting yet simple recipe on crostini from a very talented food blogger, The Little Teochew not too long ago. I had bookmarked it but have yet to give it a try. So.. this is just the perfect timing. Following the recipe I prepared the garlic flavored oil and sliced the baguette for my son. He will bring the ingredients to the potluck party to grill them so that they get to eat them fresh! Of course, I guided him and made him practice how to do it the night before. It was a hit and according to my boy, the crostinis were snapped up as soon as they were out from the oven. I prepared 4 baguettes for them( there were 20 of them)!!!


Cognac Flavoured Crostini (thanks Little TeoChew)

Ingredients
  • 1 baguette
  • 4-5 tbsp extra virgin olive oil
  • 1 knob of butter
  • 2 clove garlic (sliced/smashed)
  • 1 tbsp cognac (or vodka)
  • sea salt
  • ground black pepper
Method
  1. Preheat oven to 200C.
  2. Slice baguette into 1/2" thick pieces and lay out them on a tray.
  3. In a bowl, combine olive oil, butter, garlic and cognac, and microwave on high for about 2 minutes (so that the flavor of the garlic is infused into the oil). The butter should have melted by then, Stir well.
  4. Brush both sides of all the baguette slices generously with the flavored oil.
  5. Toast in the oven for slightly over 1 minute, or when tje start turning crusty and golden brown. Don't take your eyes off them! The bread should still be soft, chewy and pliable in the centre.
  6. Take the tray of crostini out of the oven, sprinkle with sea salt and black pepper.
  7. Serve immediately.
It is so easy to make and the taste is heavenly. I can see myself making them again in the very near future!!!


Friday, December 18, 2009

Rainy Day

It is a wet, wet day today. Been raining almost the whole day. Despite the fact that this has resulted in a more favorable temperature (around 24 C), raining days always made me gloomy.

Perhaps...this is due to the fact that I am missing my little girl, who is away in Camp. It's the school holidays in Malaysia and my little girl is attending a 5-days camp organised by the Alumni of the Outward Bound School. Last week my second son just returned from a 10-days camp in the Outward Bound School and this week is my girl's turn. Now... looks like my children are growing up and starting to leave the nest. My eldest boy (who has just completed his Pre-University course) should be starting tertiary education soon.

I have not been very productive these few days. Not much baking or crafting. I must be missing my girl. She is my youngest and only daughter. We spend quite a substantial time together as we share the same interests.

Anyway,,, this afternoon, I changed the layout of my little girl's room (with the help of my 2nd son). Been thinking of doing this for a while....but could find the time. So... since she is not in....decided to grab this opportunity to get it done. It will be a surprise for the when she comes home on Sunday. I am quite sure she will like to change ;p.


Tuesday, December 15, 2009

Gingerbread Man

Christmas is just around the corner. Despite the fact that I am not a Christian.....like most Malaysians......we still celebrate Christmas in one way or another. The other day, while I was tidying the children's bookshelves, I stumbled upon the book, "The Gingerbread Man". Now, my children have long outgrown the book...but I suddenly have this urge to bake some gingerbread man cookies. After all, it's a must have for Christmas, right?

I have never baked this cookie before. So, I started surfing the Net for help. Found this recipe online and was immediately attracted to it. It looks simple to make. The next day, I got all the required ingredients and was ready to roll out some gingerbread man. Unfortunately, I could not get hold of the gingerbread man cookie cutters as the bakery supply store has ran out of it. So... I drew the gingerbread man on a piece of paper and cut it out as a template. I had to hand cut the gingerbread man with the template using a some plastic knife. It's time-consuming but the end result was pretty satisfactory.

Gingerbread men with a scarf


Dancing Gingerbread man (or are they supposed to be running!)

Gingerbread couple!!!!

They are so cute and taste good too!. My gingerbread men are of a darker shade as I used organic black strap molasses. I do find it a bit too sweet, so the next time I will reduce the amount of sugar.

Gingerbread Man

Ingredients
2 1/2 cups all purpose flour
1/2 tsp baking soda
3/4 tsp salt
1 tsp ground ginger
1/2 tsp ground cinnamon
1/4 tsp ground cloves
1/4 tsp (freshly) ground nutmeg
pinch ground black pepper (optional)
1/2 cup butter, room temperature
1/2 cup sugar
1/2 cup molasses
1/4 cup coffee or water 1 tsp vanilla extract

Method
  • Sift together flour, baking soda, nutmeg, ginger, cloves, cinnamon and salt in a bowl.
  • Cream butter and sugar until smooth in a mixer.
  • Beat in molasses, water and vanilla.
  • Gradually add in flour mixture until a smooth dough is formed.
  • Divide the dough into 2 portions (dough will be quite soft) and cover with plastic wrap.
  • Refrigerate till firm (about 2 hours)
Preheat oven to 190C (375F)

For softer cookies :
  • Roll out the dough to just under 1/4" thick on a lightly floured surface.
  • Use cookie cutters of your choice 92-3" gingerbread man are ideal) to cut the dough.
  • Place cookies on a parchment-lined baking sheet.
  • Bake for 9-12mins (depending on the size of the cookie cutter)
  • Cookie should be slightly firm to touch at the edges.
  • Let cookie cool on the baking sheet for 5 mins before transferring on a wire rack to cool completely.

For crispier cookies :
  • Roll out the dough to just under 1/8" thick on a lightly floured surface.
  • Use cookie cutters of your choice (2-3" gingerbread man are ideal) to cut the dough.
  • Place cookies on a parchment-lined baking sheet.
  • Bake for 9-12mins (depending on the size of the cookie cutter)
  • Cookie should be slightly firm to touch at the edges and lightly browned.
  • Let cookie cool on the baking sheet for 5 mins before transferring on a wire rack to cool completely.
When cool, decorate with lemon icing (recipe below)

Lemon Icing

Ingredients
2 cups confectioners' sugar (icing sugar)
2-3 tbsp lemon juice

Method
  • In a small bowl icing sugar with lemon juice.
  • If you do not have fresh lemon juice, you can substitute with milk or cream plus 1 tsp lemon extract.
  • Add enough lemon juice to make the icing thick and pourable, but not runny.
  • Stir till very smooth
  • Scrape into piping bag with a fine tip or a ziploc bag with a corner cut off.
  • Pipe onto cooled cookies.
  • All to set for at least 30mins or until firm before storing cookies in an airtight container.


Monday, December 14, 2009

Feasting in Penang

I was away in Penang last Thursday till Saturday. My family (including my mother, brother, sisters and her family) drove up to Penang in 3 cars. It's been a while since we have been there. For those who know me, I hailed from Penang but have now been residing in Selangor for the past 2.5 decades. (about 380km apart). Took us approximately 4 hours to arrive our destination.

Upon arriving, we started our quest of savouring those delicious Penang food the we missed so much. Here is a snippet of some of the food we took.

Oh Chen (Oyster Omelette)


Fried Kueh Teow from Balik Pulau. Cost only RM2.50 per plate!!!


Muah Chee


Poh Piah


The famous Loh Bak from Kheng Pin Coffee Shop


Penang Prawn Mee


Braised Pork Mee (yummy)


Curry Mee (Penang Style)

I also managed to eat the famous Nasi Kandar in a stall called "Line Clear" located in an alley along Penang Road. It is very famous and you can see people queuing up just for it.

It is a pity that our trip was rather short... Could not eat all of the food that we wanted!!! Had to leave Penang early on Saturday morning as we need to pick up my second son who was in Outward Bound School, Lumut attending the a 10-day adventure camp. So, since he missed the trip to Penang, we managed to packed him some Fried Kuey Teow and Loh Bah to eat on the way home.


Sunday, December 6, 2009

Bunga Kantan (Torch Ginger)

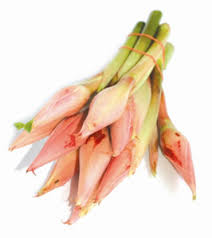
Torch Ginger or Bunga Kantan (as it is known locally in Malaysia) is known botanically as Etlingera elatior. It is a member the ginger family.

Torch ginger is believed to be a native to Indonesia. However, now this plant is grown in many tropical countries. It is grown for its extravagant flower and for food. In Malaysia, Bunga Kantan is considered as the "soul" of many Nyonya dishes such as Assam Laksa, perut ikan and assam tumis.

The bud of the Bunga Kantan is commonly sold in fresh market here. The pinkish color bud has a great aroma. They are normally halved lengthwise and used in curries and stews. When cooked, it imparts a floral fragrance and exotic aroma into the dishes. I would even use it when I cook fried rice. It adds a new dimension to the culinary palate.

I have a number of Torch Ginger plant in my garden. The plants grow from rhizomes. A mature torch ginger plant can reach a towering height of about 3 meters (10 feet) . It looks rather stately and it grows in clamps. The strap-like leaves that line alternately on the leafy shoots can
grow up to the length of 80cm.


They have given me a constant supply of bunga kantan to satisfy my taste buds. Whenever I am in the mood to cook Nyonya dishes, I just need to go to my garden to harvest a couple of torch ginger buds.(convenient and economical) So, those torch ginger in my garden never did have chance to blossom. Out of curiosity, I have left one of the buds behind when I last harvested them (as I would like to see how the flower looks like). After about a week, this is what I get ;


Very pretty. Unfortunately, as this is the rainy season in Malaysia, the flower has started to rot.


Wednesday, December 2, 2009

Sago Kueh


Sago Kueh (or Sago Cake) is a local traditional dessert. There are many ways of preparing it. Most recipes would call for boiling the sago in water. However, a friend of my taught me a very simple way of preparing this dessert (without the hassle of boiling the sago). It's just simply 4 steps :- soak, mix, steam & chill.

My Dad likes this dessert very much. Since I reduced the sugar in the recipe, Mommy likes it too. So, I made a tray and gave half to my parents and my children finished the rest.

Sago Kuah (Steamed)

Ingredients

300gm pearl sago (I used green colored sago)
100gm sugar
1 pandan leaf
1 coconut (grated) mixed with 1/2 tsp salt

Method

  • Soak the sago in water for about 1 1/2 hours or till they are translucent.
  • Rinse the sago and drain away the water.
  • Slightly oil a tray (for steaming). Oiling the tray will ensure that the sago will not stick to the base of the tray once cooked.
  • Incorporate the sugar into the sago (you can increase the sugar if you prefer it sweeter)
  • Pour the mixture into the tray and place a pandan leaf on top.
  • Steam for 15 minutes or till the sago becomes transparent.
  • Cool and chill in the refrigerator(covered with cling wrap).
  • Once chilled, cut the sago cake into small pieces with a plastic knife.
  • Toss in grated coconut.
  • Serve.
This dessert is delicious and great to eat while sitting in front of the TV ;p
My daughter's favorite.