Showing posts with label simple dishes. Show all posts

Tuesday, July 24, 2012

Not everyone’s cup of Tea (Sambal Petai Ikan Bilis)


Many people do not like eating Petai aka Parkia speciosa (bitter bean, twisted cluster bean, or stink bean) due to its peculiar smell.

Petai

In my family only DH and me like it. My children will not touch any dishes with Petai in them. So I hardly cook this dish at home.

Mom loves Petai especially when cooked with sambal (chill). She yearned it, so my sister bought back some Petai recently and I dished it out for Mom.

Sambal Petai Ikan Bilis

Mom is so happy to get to taste this dish despite the fact that it’s a wee bit too spicy (hot) for her.

Sambal Petai Ikan Bilis

Ingredients :
1 cup peeled petai seeds
1 cup ikan bilis
i big onion (cut into small wedges)
Salt & Sugar to taste
1/2 cup asam jawa juice

2 tbsp cooking oil

Ingredients

Chili paste :
15 dried chillies
5 shallots
2 cloves garlic
1 tsp belachan stock granules

Method:
1. Wash and strain ikan bilis. Place on a microwavable dish and microwave at high for 3 mins or till crispy and golden brown. Set aside.
2. Heat oil in the pan and saute the onion till fragrant.
3. Add in the ground chilli paste and fry until fragrant.
4. Put in petai and stir-fry briskly.
5. Add in asam jawa juice and and seasoning.
6. Simmer till gravy becomes thick.
7. Add in crispy ikan bilis, Mix well and dish up. Serve with hot steam rice.

Fry big onions Add grounded paste


Stir in Petai

Add tamarind juice

Add ikan bilis

Sambal Petai Ikan Bilis

YUMS!!!!

Thursday, May 10, 2012

Roasted Chicken Drumstick


Bought some chicken drumsticks yesterday with the intention to cook chicken curry. Unfortunately, this morning I realised that I have ran out of potatoes.

So, looks like I will need to change tonight’s dinner menu. Still wanting to cook something with curry powder, I have opted to roast the chicken drumsticks instead.

OLYMPUS DIGITAL CAMERA

This is a very simple recipe. With just under an hour of preparation time, this is an amazing tasty and crisp roast chicken drumstick. Got a double thumbs up from the family and DD was practically licking her fingers savouring every single bit of it.

Here is how this dish was prepared.

Roasted Chicken Drumstick (my own version)

Ingredients :

5 pieces of chicken drumstick ( One for each member of my family)

60gm butter (soften in room temperature)

2 cloves of garlic (finely chopped)

2 tsp of curry powder

1 tsp of chilli flakes

a handful of dried rosemary

salt

pepper

5 chicken drumstickClean 5 pieces of chicken drumstick. Make sure you trim off the excess fat from the chicken. Pat them dry and place them in a roasting pan.

season with salt & pepperSeason these “babies” with salt & pepper.  Leave them aside, while you prepare the marinate.

Butter garic & curry powderMix together butter, chopped garlic and curry powder in a small bowl.


mixed with dried rosemary

Mix till a paste is formed and add in the dried rosemary.


mixture on chickenSpoon the paste onto the drumsticks.


coat with mixtureRub the paste all over the drumsticks …making sure they are well coated.

Bake them into a preheated oven of 200 deg C for 45 mins.

OLYMPUS DIGITAL CAMERA

Once golden brown, remove it from the oven and let it stand in the roasting pan for a few minutes before plating them.


OLYMPUS DIGITAL CAMERA         Don’t they look delicious???


The butter made the skin incredibly crispy.

The drumsticks were really flavorful and the chilli flakes gave some heat to this dish.

This is definitely a good change from the normal curry chicken dish. Great to be taken as a main course with some salad or with a plate of hot steamy rice.

Based on the response from the family, I see myself cooking this again in the very near future.

Sunday, October 23, 2011

Birthday Longevity Noodles


DH had his birthday recently. In our family, birthday is celebrated by spending quality time together (the whole family) and eating out for that day. Sometimes, I would bake a cake for the occasion.

This year, instead of feasting out, I thought it could be a good idea to have a special meal at home. DH always prefer something simple.

So, I made longevity noodles for dinner and the children got DH a surprised cake for his birthday. Being a Chinese, I grew up to the tradition of eating longevity noodles on my birthdays. It is believes that eating these noodles is auspicious as the long strands of noodles symbolize a long life.

Instead of just cooking a bowl of longevity noodle for the birthday boy (man), I served this to the whole family. 

PA130569

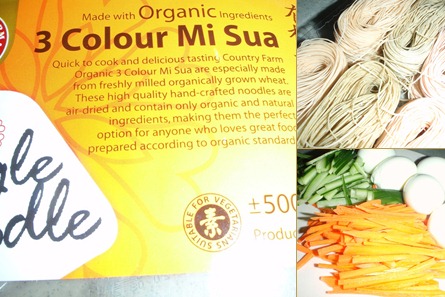
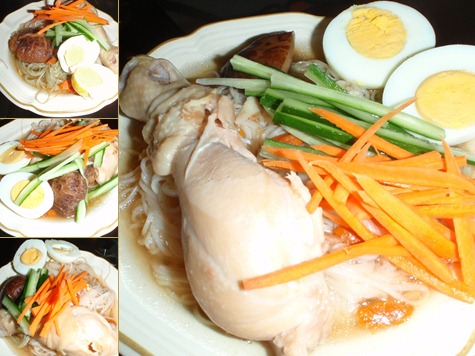
This is my own version of longevity noodles (using organic Mi Sua)

Longevity Noodles Soup

Ingredients (Serves 5 –we are small eaters)
- 1liter clear chicken stock
- 1 carrot, peeled and cut to thin strips
- 1 Japanese cucumber, cut to thin strips
- 5 hard boiled eggs, halved
- 5 drumsticks
- a handful of wolfberry (Kei chi)
- 5 shitakei mushroom (rinsed and soaked in 1 cup of water for 30 mins)
- 300gm of organic mi sua noodle

Method:

  1. Hard boil 5 eggs.To cook perfect hard boiled eggs, place eggs in saucepan of cold water (enough water to cover eggs). Bring to a boil for about 2 minutes, off the flame and cover with lid for about 10 minutes. Rinse the eggs with cold water till they are cooled. Crack the eggs gently with a spoon and remove shell. Cut in half.
  2. Cut the Shitakei mushrooms into half  and set aside. Strain the water from the Shitakei mushroom and set aside.
  3. Add the water from the mushroom into the chicken stock and bring to a boil in a pot.
  4. Add in the drumsticks, mushrooms and wolfberry. Once the broth starts to boil, reduce the flame and simmer till the drumsticks are cooked. Season with salt to taste.
  5. Rinse mi sua in cold water to remove the starch, then cook them in a saucepan of boiling water for about 2-3 minutes, separating the strands with chopsticks. Take out the cooked mi sua and set in individual bowls
  6. Pour the hot broth over the noodles, then place a drumstick, cucumber, carrot, eggs on top.

The Broth The Broth

After the healthy dinner, we had this as dessert.

PA130574 The Green Tea sponge Birthday cake :)

Happy Birthday, DH….

Many more happy returns of the day!!!

Thursday, May 26, 2011

Stir fried Cabbage with Eggs


As a busy home-maker, I often prefer dishes that are simple and fast to prepare.

One of my favourite dish would be Stir fried cabbage with eggs.

OLYMPUS DIGITAL CAMERA

This dish can be whipped up in less than 10 minutes. It taste absolutely divine served with a plate or bowl of steamy hot rice.

Despite its simplicity, this dish is full of goodness. Cabbage is low in calories and rich in fibre. It is believed to be able to prevent cancer and great for weight loss. The eggs (which is nutrient-rich) will provide all the necessary vitamins and minerals required in any diet.

All you need to cook this dish is 2 simple ingredients

OLYMPUS DIGITAL CAMERA         A bowl of shredded cabbage and 2 eggs.

OLYMPUS DIGITAL CAMERA         Heat up 2 tbsp of oil and saute some chopped garlic till golden brown.

OLYMPUS DIGITAL CAMERA         Add in the shredded cabbage and fry till cabbage turn green and translucent(about 3 to 4 minutes).

Keep things moving in the wok.

OLYMPUS DIGITAL CAMERA         Lower the heat and make a well in the center.Crack eggs into the well. Stir eggs with spatula until yolks are broken, trying to keep cabbage out of egg mixture. Allow the eggs cook for about 2 minutes until almost set.Turn up heat to medium. Stir everything together and sprinkle in 2 tbsp of water. Season to taste with salt and pepper. 

Stir fry for another minute.

OLYMPUS DIGITAL CAMERA          

Dish up and garnish with some homemade fried shallots.

OLYMPUS DIGITAL CAMERA

Serve immediately,

Yummmy!!! .

Saturday, May 14, 2011

Omelette


Often… it is the simplest thing that yields the best result.

Omelet

A simple egg dish could be just the perfect “pick me up” in the morning.

I have been slacking in the baking department again. So, this morning, with no bread/bun on the breakfast table, I whipped up some omelette for breakfast instead.

Omelette is such an easy dish to make. All you need is some eggs, cheese, oil or butter for frying and seasoning. The key to a good omelette is it must be light and moist. Here is how I do it.

Omelette (serves 2)

Ingredients :

3 eggs

a handful of your favourite cheese (grated)

3 tbsp of water or milk

Pinch of salt (to taste)

Dash of coarsely ground black pepper

1/2 tsp of parsley

Butter for frying

Method:

    1. Crack the eggs and separate the yolk from the white.
    2. Whisk the egg whites till light and frothy.
    3. Heat a heavy-bottomed non-stick sauté pan over medium-low heat. Add the butter and let it melt.
    4. Add the egg yolks, water (or milk) to the egg whites and season to taste with salt and pepper.
    5. Continue whisking till the mixture is pale yellow. (You are trying to create as much air as possible into the mixture to yield a light and fluffy omelette).
    6. Gently fold in the grated cheese  and the paisley into the mixture.
    7. When the butter in the pan is hot enough to make a drop of water hiss, pour in the eggs. Don't stir! Let the eggs cook for up to a minute or until the bottom starts to set.
    8. With your spatula, lift one edge of the egg and fold it across and over, so that the edges line up. Cook for another minute or so, but don't overcook or allow the egg to turn brown. If necessary, you can flip the entire omelette over to cook the top for 30 seconds or so. Just don't let it get brown.
    9. Gently transfer the finished omelette to a plate. Garnish with some cherry tomatoes or fresh herbs. if desired.

A simple yet wholesome breakfast at can be whipped up in less than 5mins.

Yumz.


Saturday, September 4, 2010

Pumpkin Porridge (Pumpkin Congee)


Sometimes I am amazed at what one could whipped up with some leftovers. We had some relatives over for a Potluck Party last weekend. I roasted 2 chicken for the occasion and had some leftovers that I could use for the week. Not wanting to cook something extravagant, I decided to cook us a pot of hearty delicious porridge for dinner on Tuesday.

OLYMPUS DIGITAL CAMERA

Found a section of pumpkin in my fridge and thought it might be a good idea to cook pumpkin porridge. My version of cooking porridge is very simple, Whenever, I cook porridge, I like to throw in as many things as I can find (edible ones, of course) from my fridge and pantry. It’s always a nice concoction carrots, onions and meat.  It is by itself a one dish meal…so no need to cook any side dishes!!!

Here is how it’s done

Pumpkin Porridge

Ingredients
(Serves 4-5)

- 1 carrot – diced

- A small piece of pumpkin, skin removed & cut to small cubes (about 200g without skin)
- 200g leftover roasted chicken - diced (you can also use bacon  to better flavour
- 3 dried shitake mushrooms  -soaked and cut to cubes (but not too thin)
- 1 tbsp chopped garlic
- 1 large onion, chopped
- 1 1/4 cup of rice, washed
-  2 dried oyster – chopped (or 5-10 dried scallops)
- 10 red dates
- 2 litres of water
- 50g butter
- 1 tbsp wolfberries
- 1 to 2 tsp of light soy sauce (adjust according to your liking)
- 30g salted fish, cut to small bits

Method

  1. Heat butter in wok. Saute garlic, onions and salted fish till fragrant.
  2. Add pumpkin, carrot,mushrooms and stir fry for a short while.
  3. Add uncooked rice and fry till the onions are clear.
  4. Transfer the stuff from the wok, wolfberries, red dates and the previously cooked meat, to a pot, add water, and bring to a boil.
  5. Frequently stir the pot  to prevent the rice from sticking to the base.
  6. Simmer on a low heat for about 20-30 minutes (or longer if you want congee*), while leaving lid partially covered (if you cover fully, the water will spill over).
  7. Season with light soy sauce.
  8. Garnish & serve.

Since I use a thermal pot,… instead of simmering for 20-30 mins, I just transfer the whole pot into the thermal. The porridge will be perfectly cooked within an hour. Economical and environmentally friendly ( Conserve gas)

OLYMPUS DIGITAL CAMERA

My porridge is a bright orange due to the carrots and pumpkin.

Yummilious!!! 

Monday, August 30, 2010

Mee Siam (Spicy Rice Vermicelli)


Did I ever tell you that Dear Hubby can cook?

Well, he is not to shabby in this department (just that he does not do it often). One of his signature dish would be the Mee Siam.

OLYMPUS DIGITAL CAMERA

So, whenever the family yearns for Mee Siam, DH would be the one to dish it out. OLYMPUS DIGITAL CAMERA

However, this time around. I have decided to cook the Mee Siam. I have steered myself away from DH’s version which uses dried shrimps and belachan. I googled and found this version from Rasa Malaysia.

OLYMPUS DIGITAL CAMERA

Mee Siam or “Siamese noodles” is basically spicy fried rice vermicelli with various toppings such as shrimp, chicken, fried firm tofu, and shredded omelet. This is a simple one dish meal and is popular in Malaysia and Singapore. There are 2 different version though The Singaporeans have theirs wet while the Malaysians version is dry. The one I made is Malaysian dry Mee Siam

 OLYMPUS DIGITAL CAMERA         OLYMPUS DIGITAL CAMERA


MEE SIAM RECIPE (SPICY RICE VERMICELLI)

INGREDIENTS:

12 oz (340gm) vermicelli (I used 500gm)
12 oz (340gm) bean sprouts (I used 500gm)
12 shrimps (shelled and deveined) (I used 25)
4 oz chicken (cut into thin strips) (I omitted this)
3 pieces fried bean curd/firm tofu (cut into pieces)
3 stalks Chinese chives (chopped into 1-inch length)
1 teaspoon sugar (I omitted this)
Salt to taste
Soy sauce or fish sauce to taste
3 tablespoons oil

SPICE PASTE:

4 red chilies
5 shallots
5 garlic
2 tablespoons taucheo (fermented yellow bean sauce)

GARNISH:

2 eggs (lightly beaten, seasoned with a pinch of salt)
2 stalks scallions (chopped into 1/2-inch length)
2 limes (cut into wedges) (I used calamansi)
1 red chili (thinly sliced)

METHOD:

Soak the vermicelli in warm water for about 30 minutes or until they turn soft. Drain and set aside. Using a food processor, grind the spice paste and set aside. Heat up a wok with some oil and make the beaten eggs into an omelet. Fold and slice the omelet thinly. Set aside.

Heat up the wok and add 3 tablespoons of oil. Once the oil is heated. fry the spice paste until aromatic and the oil separates. Add shrimps and chicken, stir-frying until half done, then add the fried tofu pieces.

Add the vermicelli and keep stirring until the the spice paste has spread evenly. Add sugar and salt to taste, follow by bean sprouts and chives. Continue to stir-fry until the vegetables are cooked. Taste and adjust the seasoning by adding more salt or sugar to taste. If the noodles taste bland, add a little soy sauce / fish sauce to taste.

Transfer the Mee Siam onto a big serving bowl and garnish with the omelet strips, chopped scallions, chili and lime wedges. Serve immediately.

Verdict :  Yummy…. the family loved it. Now we have 2 versions for Mee Siam. (Mom’s or Dad’s!)

Friday, June 25, 2010

Creamy Mashed Potatoes with Fish & Chips


It's been a while since I cooked a western meal for my family. Thought it might be a good idea to change the menu and surprise the family with a western meal.

Fish & chips should be simple. So this is what I made for them.


I cheated as I used a store bought Tempura Black Pepper Fish Fillet.

There were altogether 5 pieces in a box. Just nice for my family as we only need a piece each. So I deep fried them and also some shoe strings / French fries. For the greens, I stir fried some baby French beans with garlic. To add color, I throw in some cherry tomatoes. And Viola... this is a meal.


My children love mashed potatoes. To brighten up their day even more, I made them some creamy mashed potatoes to compliment this dish. Made it earlier in the day as my schedule in the evening was rather packed on that day.


This is a great recipe and the mashed potatoes is so delectable. and creamy.


Creamy Mashed Potatoes

Ingredients

1 kg potatoes
1/3 cup butter
100gm cream cheese (softened)
1/3 cup whipping cream
Seasoning
1/2 tsp salt
1/2 tsp black pepper

Method :
  • Peel potatoes and cut the into small pieces (similar size)
  • Boil the potatoes in a big pot of water for about 30 minutes or until the potatoes are cooked through or soft.
  • Drain the potatoes and put them back into a dry pot.
  • Mash the potatoes over a low heat to allow all the steam to escape.
  • Remove the pot from the stove and add in all the rest of the ingredients.
  • Continue mashing till creamy before adding the seasoning.
Note : If you prepare this dish way ahead of time, you can let it cool down and store in the fridge (for up to 2 days). To serve, make sure you take it out from the fridge for at least 2-3 hours. Throw a few pats of butter on top and bake it in the oven at 180C/350F for about 20 mins or till the potatoes warmed through.


Sunday, May 30, 2010

Salmon Teriyaki


I normally do not cook dinner on Sundays. (It's my day off! ;D ).

However, today is an exception. DH is away on business trip in China. I am lazy to bring the children out for dinner. Since I just bought a bag of Calrose Rice (Japanese rice), I thought it could be a good idea to prepare a Japanese meal for the family. My children love Japanese food.

I have 2 slices of Salmon in my freezer. So decided to cook Salmon Teriyaki. It will go well with the Japanese rice. A Stir fry Choy Sum and Black Pepper Mushroom dish will complete this meal. Simple and delectable.

This is how I cooked the Salmon Teriyaki.


Salmon Teriyaki


300gm Salmon block/slice - Cut into slabs, pat dry and season with some salt.

Pan fry the salmon and set aside.

Teriyaki Sauce

2 tbsp sugar
2 tbsp mirin
2 tbsp soy sauce

Mix the 3 ingredients together in a small saucepan. Bring it to boil. Keep stirring and reduce the fire to Medium flame so that the sauce will not burn. The sauce will thicken and result in a shiny glow. Set the sauce aside.

Once the Salmon is pan fried, arrange them on the serving plate and drizzle the teriyaki sauce onto the Salmon. Tadaa... ready to eat!

This is what my children and I had for dinner tonight.


To make this meal more Japanese, I used my Japanese rice bowls and Japanese chopsticks. A refreshing change from the normal dinner plate with fork and spoon.


Sunday, February 28, 2010

Harumi-san's Tuna and Carrot Salad

It's the last day of the Chinese New Year. (the Chinese celebrates their Lunar New Year for 15 days). With the whole fortnight of feasting and stuffing myself silly with all the culinary pleasures, it is now time for me to start preparing and eating light and healthy food.

My children love Japanese food. So, I can never go wrong if I were to whip up a dish or two from that part of the world. In January, Ju of The Little Teowchew posted a very simple recipe called Tuna and Carrot Salad. This recipe originates from Harumi Kunhara (栗原はるみ), the Martha Stewart of Japan. I had it earmarked and decided to make it today. Despite it's simplicity, this is such a delicious salad. I doubled the portion and we finished everything in one sitting!!!!! Thanks Ju for the recipe.


Tuna & Carrot Salad (orignally from Harumi Kurihara and adapted from The Little Teowchew)

Serves 4
Ingredients :
200g carrots, peeled
90g tinned tuna

50g finely chopped onion
(like Little TeowChew, I also julienned them instead of finely chopping them)
1 tsp chopped garlic
1 tbsp sunflower or vegetable oil

Dressing:
2 tbsp white wine vinegar

1 tbsp mustard, preferably French grain mustard
(I used Wasabi , just like Little TeowChew)
Salt and pepper to taste
Soy sauce to taste (I omitted this)
A light drizzle of honey (to balance the tang of the vinegar)
Toasted Sesame seeds

Method:
  • Cut the carrots into lengths of 5-6cm thick juliennes.
  • Put them into a microwavable bowl and mix in the onions, garlic and sunflower oil. Cover and microwave for 1-1.5 minutes (600W).
  • Once the veggies are lightly cooked, put them onto a serving plate, add the drained tuna and then the dressing and toss to mix well.
  • Sprinkle same toasted sesame seeds on top.
  • Serve hot or cold. (I had it chilled as the weather these days is so hot).

Monday, October 19, 2009

Steamed Drunken Prawns


Being of Chinese origin, it is normal to see me cooking Chinese dishes. There are hundreds of Chinese dishes that will satisfy our palate to the fullest; be it Cantonese, TeowChew, Fujian, Shanghainese etc. What never fail to amaze me it the very interesting names given to the dishes.

Let's take today's dish that I cooked. Steamed Drunken Prawns.... pretty humorous name isn't it? If you if Chinese Kung Fu, you must have watched or heard about this famous Chinese Kung Fu movie called "Zhui Quan" or "Drunken Master" before. This Hong Kong movie starred the famous Jackie Chan. Now.. there is no connection between the Drunken Master (in the movie) with the Steamed Drunken Prawns that I made today. The Drunken Master did not get himself drunk after consuming Steamed Drunken Prawns!!! LOL

Actually, Steamed Drunken prawns got its name through the process of immersing the herbs into the wine and having the prawns steamed in this concoction. This is a very simple dish. Minimal preparation and since it is steamed you can be assured of a healthy and delicious restaurant like dish in 10 minutes
Steamed Drunken Prawns

Ingredients
300g large / medium size Prawns with shell(the fresher the better)
5-6 slices of Dang Gui (Chinese Angelica
6 Red Dates (seeds removed)
2 tsp Qi Zi (wolfberry)
50ml Hua Diao Jiu (or any type of liquor eg brandy, rice wine, sake)

Method :
  1. Pre-soak the herbs in the liquor for at least 30 minutes to an hour to enable the liquor will absorb the aroma of the herbs.
  2. Trim and wash the prawns.
  3. Pat dry and arrange then in a steam tray or plate in a single layer. (Do not overlay as it will results in uneven cooking time during steaming.
  4. Arrange the herbs on top of the prawns and pour the remaining liquor on it.
  5. Steam over boiling water for about 4-5 minutes, remove and serve immediately.

Notes :
You could also microwave it by covering it with plastic wrap an cook on Medium power for 5 minutes. Be sure you use microwave utensils while steaming it on a microwave.

Friday, October 16, 2009

Pong Teh Chicken (my version)


Pong Teh Chicken is Braised Chicken in Fermented Paste. This is a typical Nyonya (Straits Chinese or Peranakan) dish.

The Straits Chinese are the descendants of the Chinese traders who came to Malaya in the fifteen century and took Malay (local) wives. The Nyonya's way of life, language, food, customs and dressing have become an amalgamation of Chinese and Malay and they have even developed a style uniquely their own.

Pong Teh Chicken is a popular Nyonya dish in Malacca. To me it is a kind of comfort food and a one dish food which you can serve with steamed plain rice.

The basic ingredients in this dish is chicken, potatoes and fermented bean paste. Mychildren like carrots, so you will find carrots in my version of Pong Teh Chicken. I opt to omit sugar in this dish as I prefer the taste of natural sweetness of the carrots.

Pong Teh Chicken (my version)

Ingredients
1/2 chicken - cut into bite-sized pieces
2 potatoes - cut into small pieces
1 carrot - cut into small pieces
10 shallots
4 pips garlic
1 big onion - cut into wedges
2 tbsp fermented soy bean paste
2 tbsp cooking oil
2 cups hot water
1 tsp thick soy sauce
salt to taste

Method :
  1. Pound / blend shallots and garlic till fine.
  2. Stir fry the shallot and garlic mixture and fermented soy bean paste in oil till fragrant.
  3. Stir in the big onion till soft.
  4. Add in chicken and stir fry for about 3 minutes.
  5. Add in potatoes and carrot. Stir fry for another 2 minutes.
  6. Pour in 2 cups of water and thick soy sauce. Bring to a boil.
  7. Lower the flame and continue to cook until chicken is tender.
  8. Add salt to taste.
  9. Serve hot.